Is Your Absorption Chiller Leaking?
So, you have reason to believe that you may have a leak in your absorption chiller (to learn more about the possible indications of a leak, please read: Does Your Absorber Have a Leak?). Assuming you are now at the point of trying to pinpoint the leak, the steps below will guide you through the process.
Finding the Leak in the Absorber:
-
- First, turn off both the chilled water supply and chilled water return valves.
- Second, drain all of the water boxes. This includes the chilled water boxes (the condenser and absorber water boxes) and the hot water box.
- Next, install a 0 to 30 PSIG gauge on the top of each one of the water boxes.
- Add a compound gauge on the shell side of the absorber.
- Add nitrogen to the absorber. This will break the vacuum, bringing the pressure to 0 PSIG (on the gauge in Step 4.). The gauge should start at 30 inHg (mercury) when the absorber is in a vacuum state, and will come up to 0 when you add nitrogen to the absorber.
- Remove the rupture disk (for more information on the rupture disk, see How to Leak Check the Rupture Disk on an Absorption Chiller).
- Install a blank-off plate (blank-off plates are used to seal off the absorber when leak checking to prevent the rupture disk from rupturing) in place of the rupture disk.
- Add a 1 lb. PSIG refrigerant tracer gas (Freon Refrigerant) to the system. This should be either R22 or R134a Freon (they are not the same).
- Add nitrogen, bringing pressure up to 10 lbs PSIG (again, by reading the gauge you installed in Step 4.).
- Drop a roll of brown rolled paper under the entire unit.
- Return the following day (wait at least 8 hours), and inspect the paper for any lithium bromide spills (may look like a salt deposit—Lithium Bromide is 55% salt solution). From here, you should be able to look straight up from the spill to pinpoint the leak.
- If there are no liquid (lithium bromide) leaks on the paper, check the water box gauges. Check the vacuum gauge. If it moved away (9 instead of 10 or less), you have a leak.
- If the pressure on the water box gauge increased, you have a leaky tube (which is a whole new beast to deal with—contact me directly if you need further assistance).
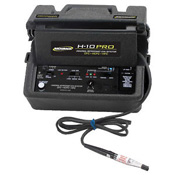
- If there is no leak (lithium bromide) evident on the brown roll paper, and the pressure gauges are still the same (i.e. no tube leak), then the final step is to get an H10 electronic leak detector and leak check the absorber around the welds, mechanical seals, mechanical fittings, etc., above the liquid level).
Safety Tips
(1.) First, do not forget to remove the rupture disk and replace it with a blank-off plate. If you don’t take the rupture disc off, you’re going to blow the rupture disc (which will be expensive to repair). You’re also like to blow the hot lithium bromide water (often upwards of 160 degrees) all over the place. This could end up causing a little trip to the emergency room. (2.) Second, avoid getting Lithium Bromide on your skin or clothes. Lithium Bromide has a very high affinity for water and will, therefore, suck water or moisture out of your skin (which will likely cause a mild burning sensation in small amounts). It may also ruin your clothes, especially leather.