Does Your Rupture Disk Have a Leak?
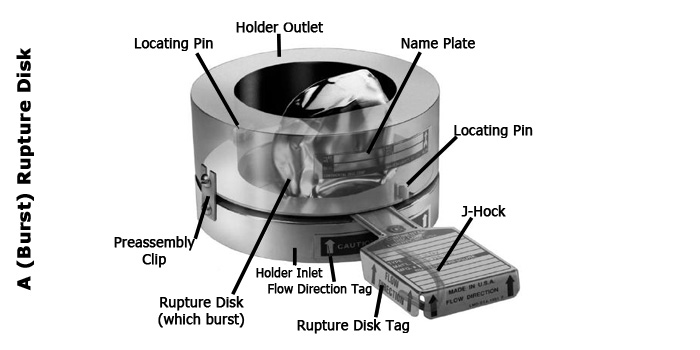
Also known as a burst disc, a burst diaphragm, or a pressure safety disc; a rupture disk is a non-reclosing relief device which is used to protect a pressure vessel such as a condenser or absorption chiller from overpressurization, or possibly damaging vacuum conditions. The rupture disk is designed to fail at a certain, predetermined pressure differential in order to save the absorption chiller (or other components which would be more expensive to replace).
The rupture disks on absorption chillers have a one-time-use steel membrane which, if it bursts, lets you know that you have a problem with the pressure in the chiller. Sometimes, however, the membrane will not “burst,” but will instead leak. This can make it difficult to determine if and where your absorption chiller has a leak. (To learn more about the possible indications of a leak, see Does Your Absorber Have a Leak?) When you think your absorption chiller has a leak, the rupture disk is the first thing to check.
How to Check if Your Rupture Disk is Leaking
The good news is that if you think you may have a leak in your rupture disk there is a simple way to check. Follow these steps:
- Wrap the rupture disk with cellophane wrap or Saran wrap. Wrap the top of the rupture disk the same way you would a bowl of leftovers from dinner. One layer is fine. Just make sure it’s airtight.
- Leave it overnight.
- If you return in the morning to find that the cellophane burst or imploded, then your rupture disk is leaking and it needs to be replaced.
- Call an HVAC specialist or absorber technician as soon as possible to come out and remove and replace the leaking rupture disk. This will involve breaking the vacuum with nitrogen and bringing the absorber up to atmospheric pressure, before the rupture disk itself can be removed and replaced. Once that is complete, then you can bring the vacuum back down in the absorber, which may take some time (up to a day or longer), depending on how big the chiller is.
- Be careful not to delay, or you may face some or all of the following consequences:
- Performance will not be achieved.
- Frequent purging.
- It will cause the inhibitor to deplete quickly as a result of the non-condensables (air) in the machine.
- The worst problem is when the inside of the absorber is exposed to oxygen, along with the lithium bromide that’s in the chiller. This will cause corrosion to take place at a very fast rate. The bottom line is that failing to replace the rupture disk can damage your absorption chiller—a very expensive machine.
- If you return in the morning to find that the cellophane has not burst or imploded, then your rupture disk is not leaking. If you still think you may have a leak, however, then you will need to look other places to find the leak. At this point, you may want to perform a leak check on your absorption chiller. You can check out How to Leak Check an Absorption Chiller Using a Mercury Manometer for details on how to do that. Also, look for the upcoming post: How to Properly Leak Check an Absorption Chiller and How to Find the Leak on an Absorption Chiller.
Safety Tip
The primary safety tip with this procedure is to be sure and bring the absorption chiller up to atmospheric pressure: 0 PSIG (or 14.7 PSIA), before you start replacing the rupture disk.